Torqueflite Kickdown Cable Kit
Installation Instructions
Congratulations. With this purchase, you have remedied the age-old problem of chasing the correct throttle pressure linkages, pivots, and brackets from salvage yards or poor imitations of original parts. This kit will work on most all Chrysler rear wheel drive vehicles with a Torqueflite transmission from 1962 with just about any carburetor(s) combination.
The installation instructions on the following pages will address most all situations as clearly as possible. The installation requires minimal mechanical experience and basic hand tools. Please read the instructions carefully, compare each step with diagrams, and if you do not understand, go back and read it again.
NOTE: If transmission has internal problems including slipping, noises, etc., this kit will not cure or improve any shifting qualities. However, on a sound torqueflite in average condition, this kit will provide you the correct throttle pressure to the transmission regardless of engine size, type and number of carburetors, and style of manifold.
At this time, check your parts list, found on the back of instructions, and make sure you have all the necessary parts. Check the tool lists, also found in the instructions, for proper tools needed. The only pre-existing parts required, not included with this kit are:
A. Some form of accelerator cable mounting bracket to intake manifold or utilizing BPE Part # 3395.
B. O.E. Accelerator cable stud & nut at carburetor (manual or automatic, either will work or BPE Part # 3349)
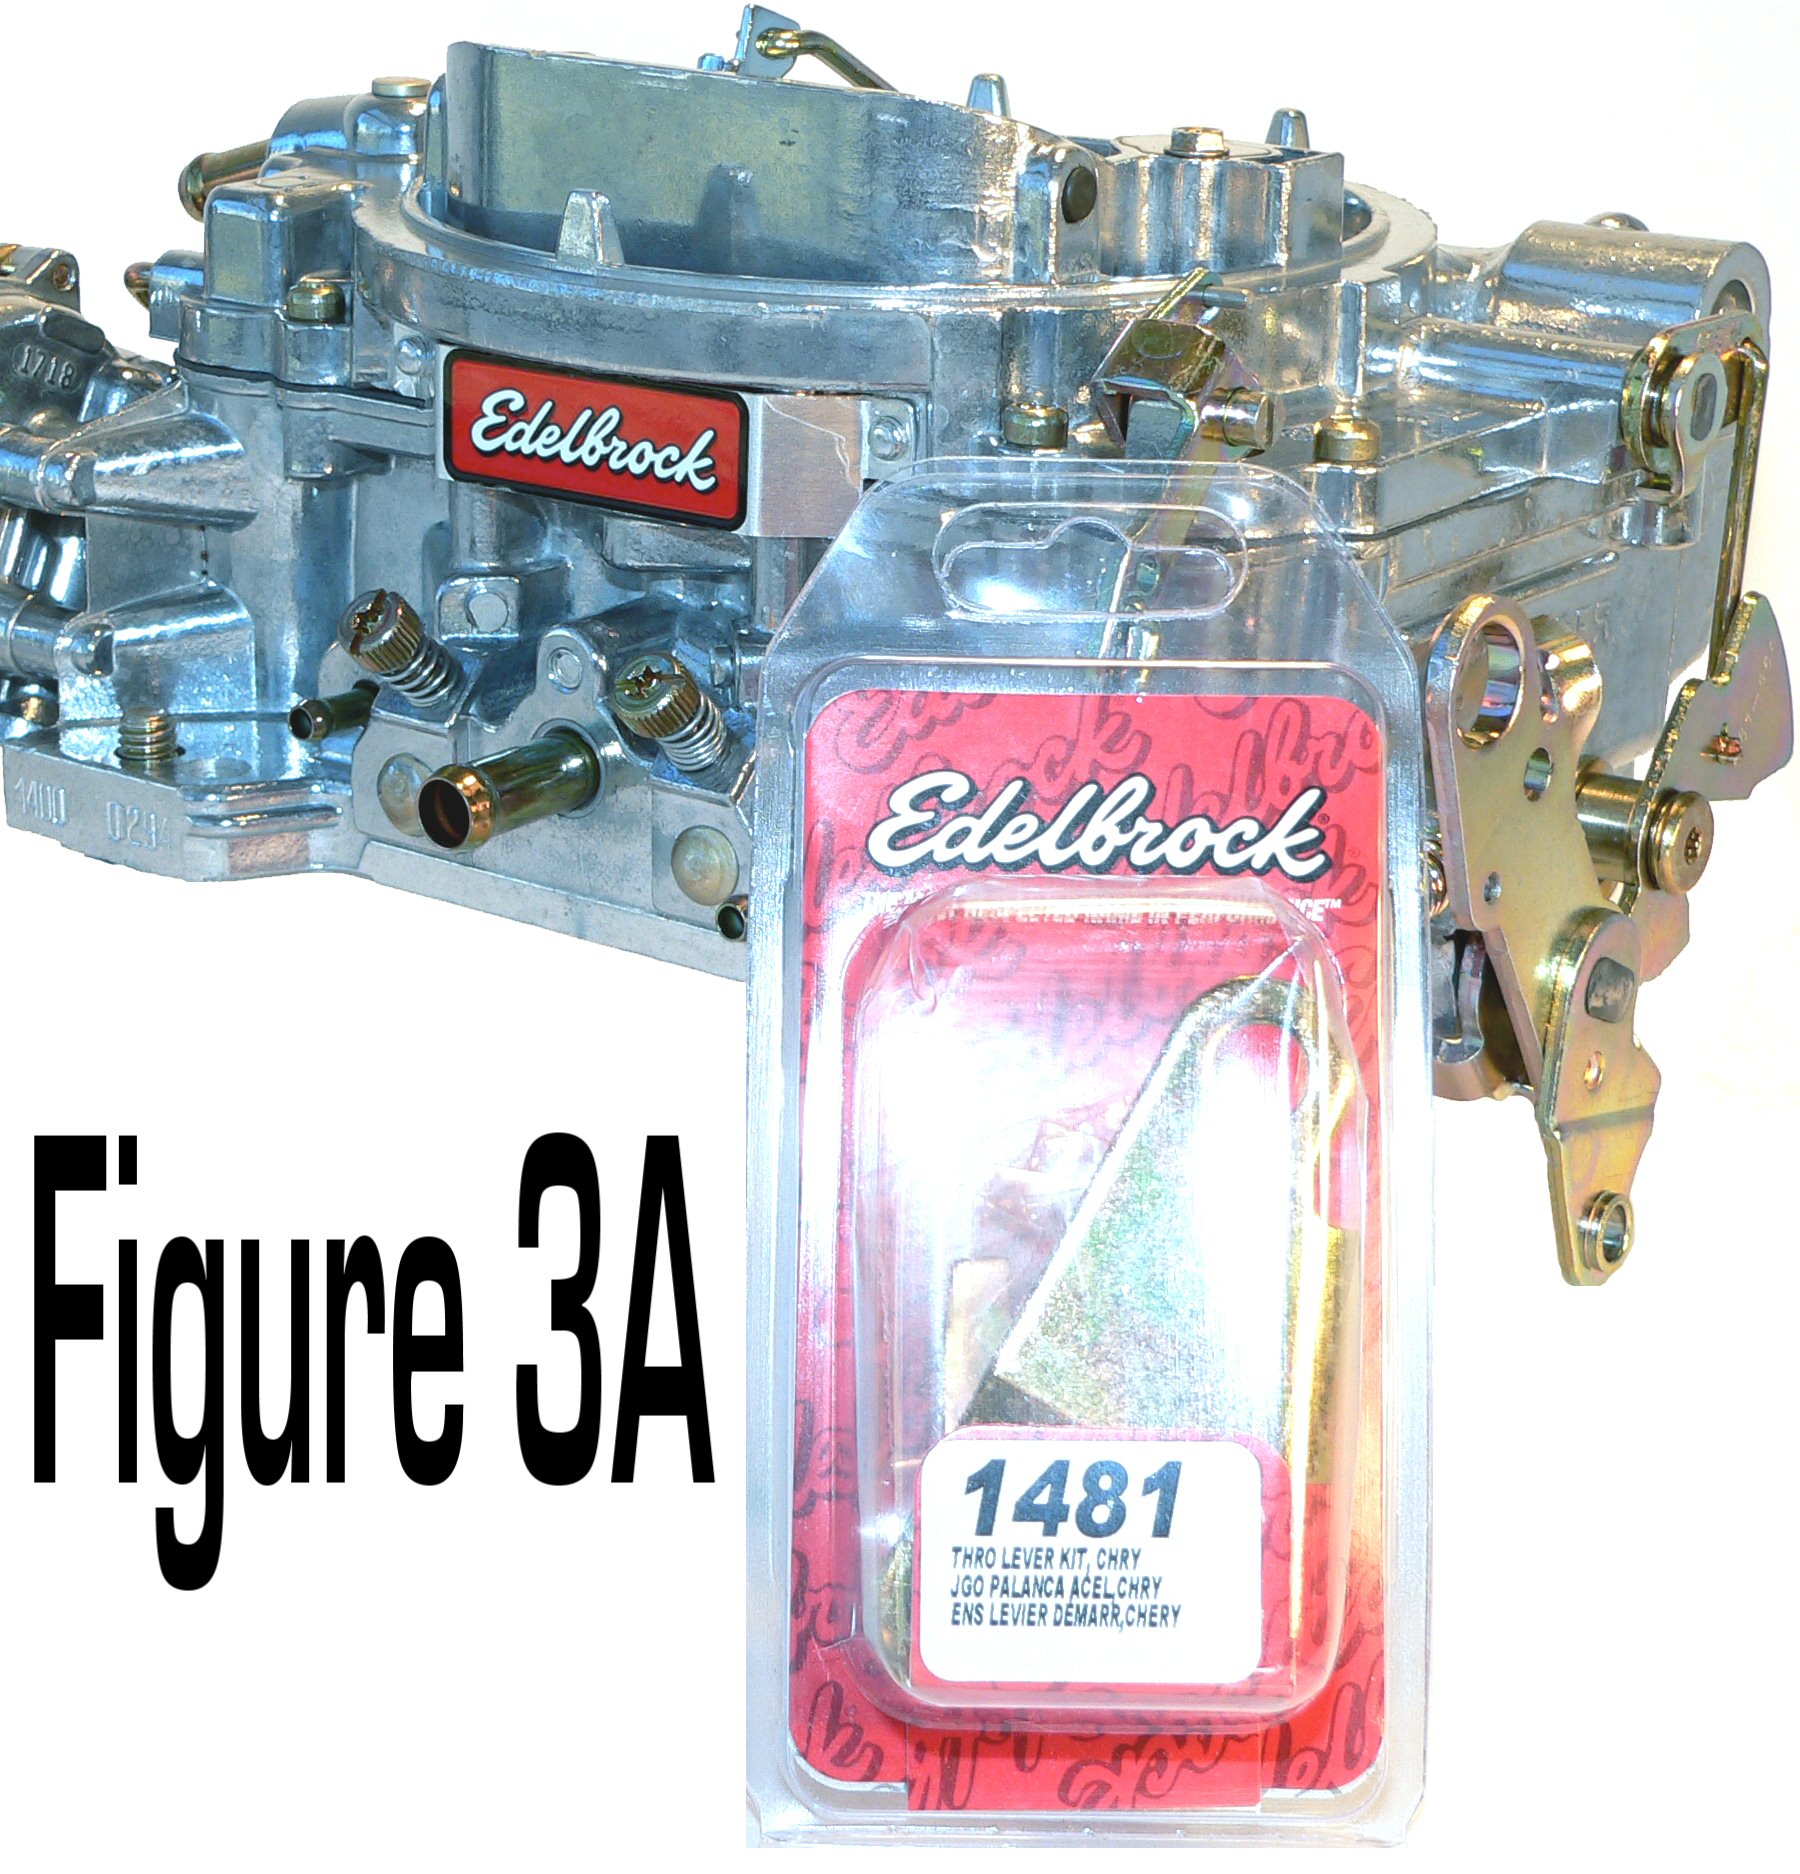
C. Using Edelbrock / Carter aftermarket carburetors must use Edelbrock part # 1481 or Carter part # 3-2087, Chrysler Throttle Lever Adapter Bracket.
Before beginning, Identify the Manufacture and Style of Your Carburetor(s) on your intake manifold. The instructions will indicate the 4 major differences in throttle levers.
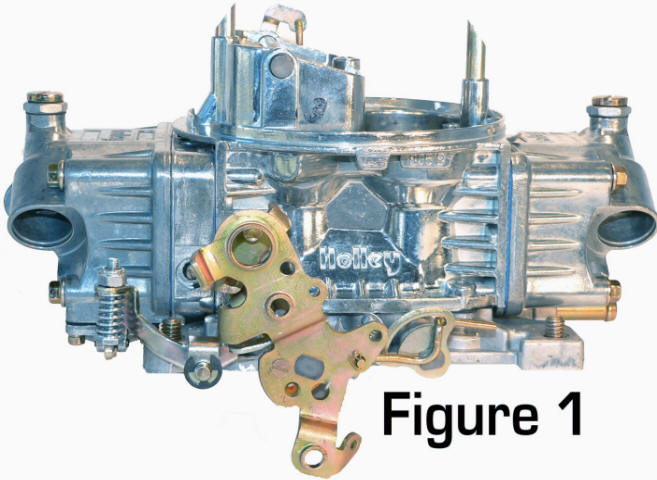
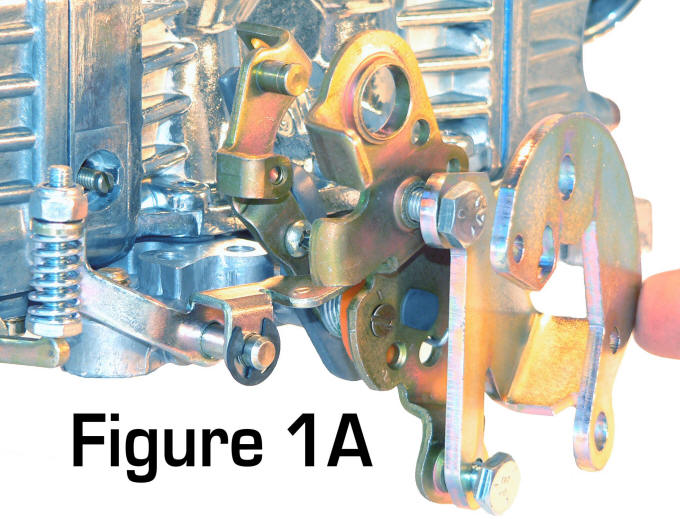
1. UNIVERSAL HOLLEYS include all aftermarket Holley Universal (Chevrolet linkage) carburetors all 2bl and 4bl carburetors. (Most Holleys Bought Aftermarket). Figure 1
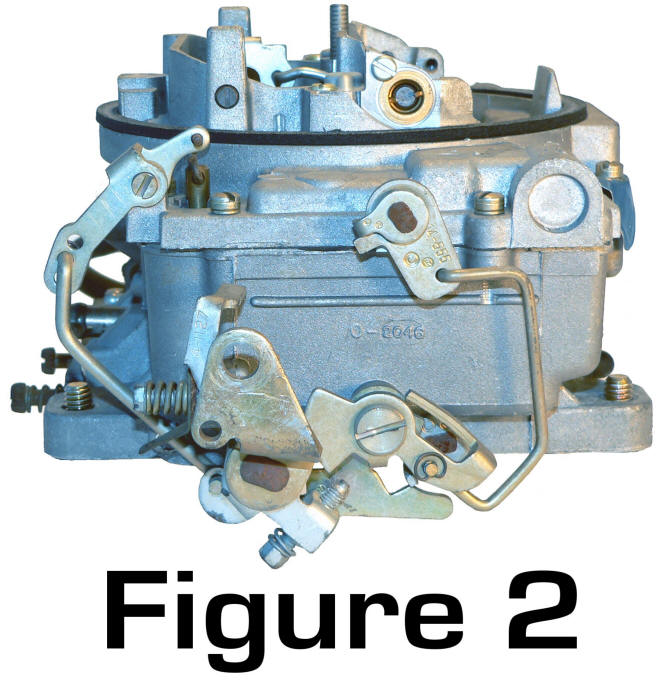
2. ORIGINAL EQUIPMENT CARBS. include all O.E. Carters; BBD 2bl., AFB, AVS, and Thermoquads, O.E. Holleys; 2bl., 4bl., 6 pak, and O.E. Rochester 2bl. and 4bl. Figure 2
3. UNIVERSAL CARTER / EDELBROCK CARBS. include universal or performance AFB, AVS, Thermoquads, Edelbrock, and carburetors. Figure 3

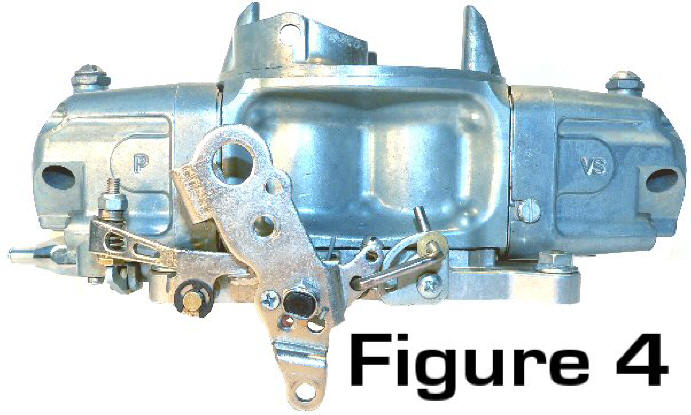
4. DEMON CARBS NEW INSTALL/UPDATE
Includes all DEMON Carbs. Figure 4
PREPARATIONS:
Time to install this kit is approx. 1 - 1 1/2 hours. Pay close attention to all the steps. Read all instructions first and familiarize yourself with the parts, terms, and procedures. Work slowly and do not force cable into binding situations. Do Not Start Engine Until Final Checklist is Complete. The vehicle should be off the ground for ease of installation of lower cable and mounting hardware. Make sure the vehicle is firmly supported by Jack Stands!!!!
Remove all remaining kickdown linkage, rods, pivots, pivot studs, and throttle valve lever from vehicle. Throttle valve lever at transmission may be removed by loosening pinch bolt at rear of lever (upper lever on '66 and later Torqueflites). Remove O.E. accelerator cable from carburetor.
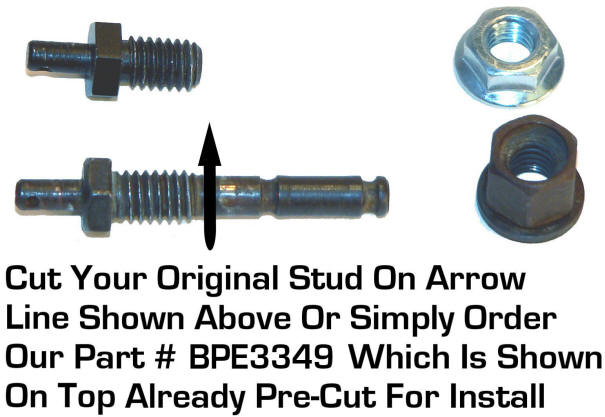
Accelerator Cable Stud &Nut
Original Equipment (not included) Cut As Indicated & Save For Reuse
REQUIRED TOOLS
7/16" Wrench
1/2" Wrench
9/16" Wrench
5/8" Wrench
11/16" Wrench
Needle Nose Pliers
Hammer Small
Hacksaw
File
Common Screwdriver
Adjustable Wrench, Small
Installation of Throttle Lever Adapter
UNIVERSAL HOLLEY (MOST)
Locate Throttle Lever Adapter furnished in kit. On Universal Holleys, Bolt bracket to throttle lever with (2) 1/4"-28 x 5/8" Bolts, Nuts, and Lock Washers. (see Figure 1A)
NOTE: Some OLDER Holley Double Pumper Carbs. See Next Page After Next Step
Throttle Lever Adapter Modification For O.E. Carbs. & Universal
Edelbrock, Carter Carbs.
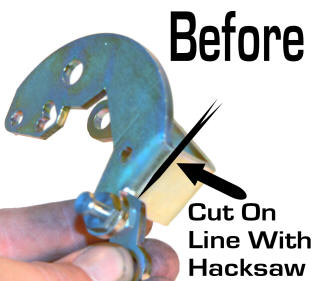
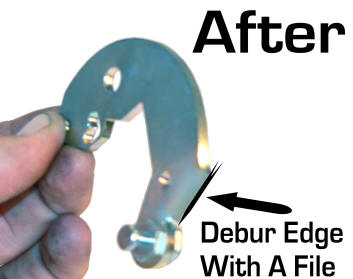
On O.E. Carburetors and Universal Carter / Edlebrock Carburetors hold Throttle Lever Adapter in bench vise and cut with hacksaw as indicated in pictures below. Use file to dress off remaining Throttle Lever Adapter edge for appearance and fit. On Universal Carter / Edelbrock carburetors, a special adapter bracket is required that is not included in this kit. Edelbrock part # 1481 or Carter part # 3-2087 (see Figure 3A). “This bracket usually provided with new Edelbrock or Carter Carburetors for Chrysler Products
ORIGINAL EQUIPMENT CARBS
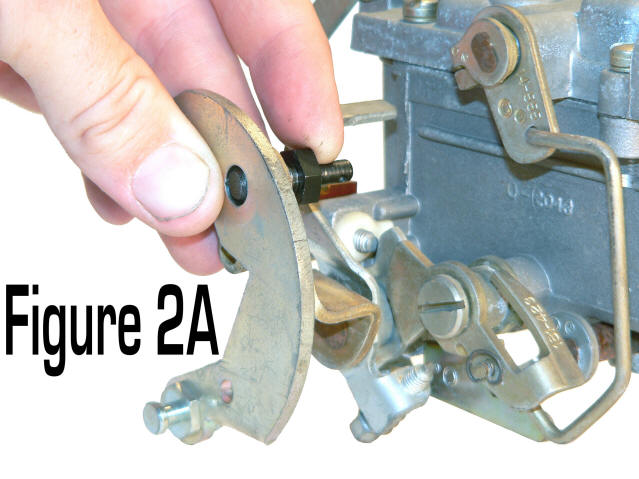
Step 1. Bolt Modified Throttle Lever Adapter to carburetor with original Accelerator Cable Stud & Nut (see Figure 2A)
Step 2. Rotate to align Heartshape hole with hole in throttle lever. Install 10-24 Machine Screw & Locknut provided. (see Figure 2B)
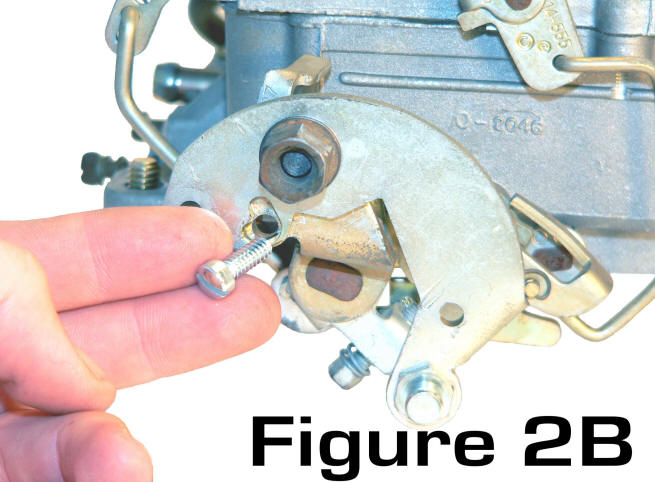
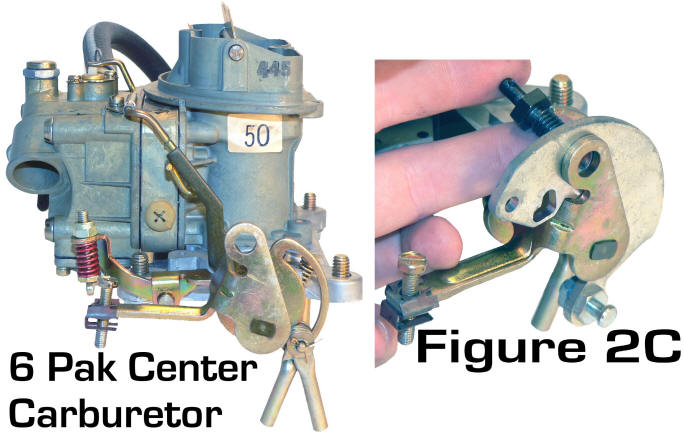
6 Pak Center Carbutetor
Bolt on inside of O.E. throttle lever. V-Notch in Throttle Adapter Bracket will interlock into throttle lever & O.E. Cable Stud & Nut is all that is needed to install. Screw & Nut not required. Use with O.E. accelerator cable bracket. (see Figure 2C)
UNIVERSAL CARTER / EDELBROCK CARBS.
Step 1. Edelbrock part # 1481 or Carter part # 3-2087 (usually provided when carburetor purchased) must be used. (Not included in this kit) (see Figure 3A)
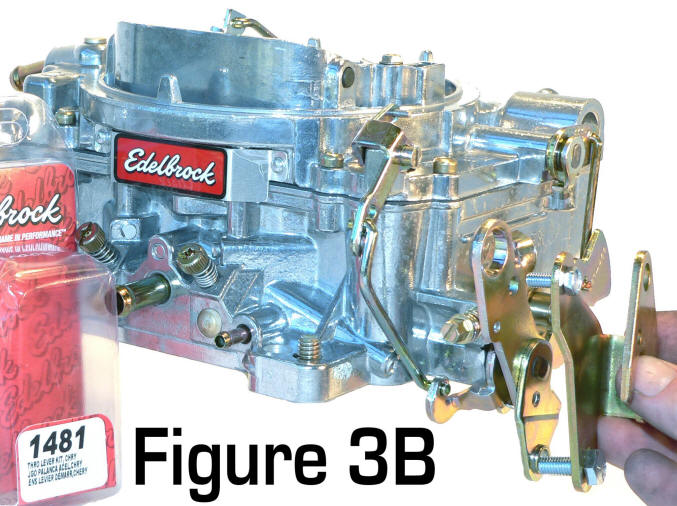
Step 2. Install part #1481 / part # 3-2087 (not included) as pictured with hardware provided with part # 1481 / part # 3-2087. (see Figure 3B)
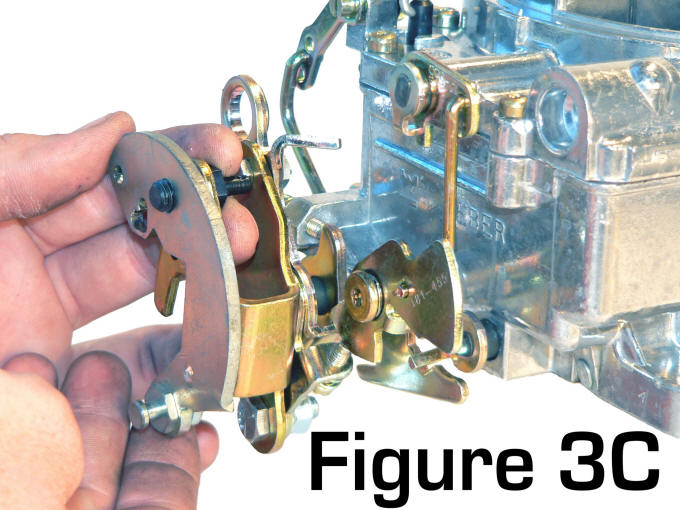
Step 3. Bolt Modified Throttle Lever Adapter to carburetor with Original Accelerator Cable Stud & Nut (not included) (see Figure 3C)
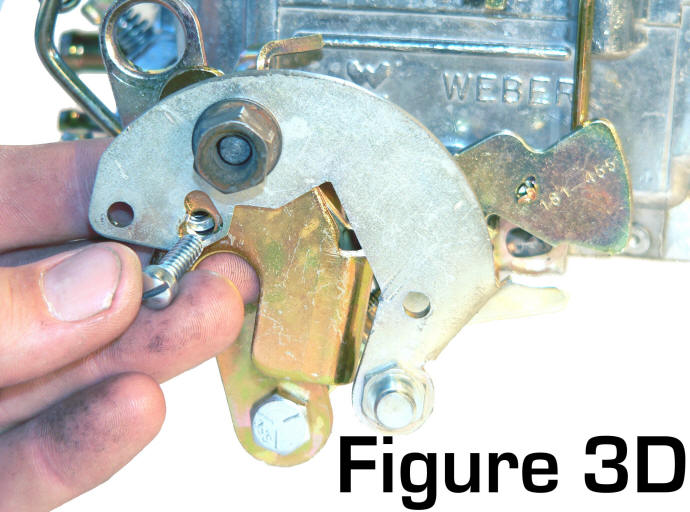
Step 4. Rotate & Align Heartshape hole in Modified Throttle Lever Adapter with small hole in part # 1481 / part # 3-2087 (not provided). Install 10/24 Machine Screw and Locknut (provided). (see Figure 3D)
SOME OLDER HOLLEY DOUBLE PUMPERS
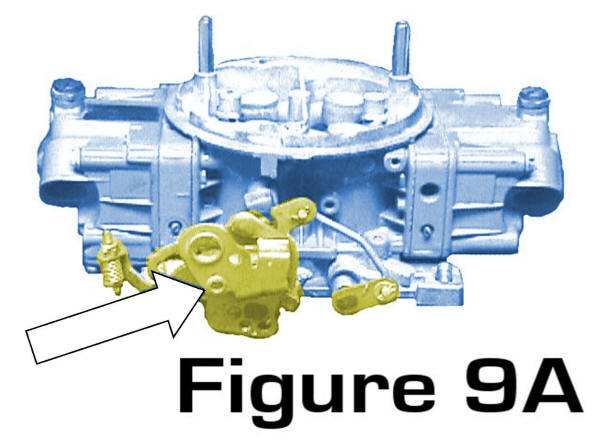
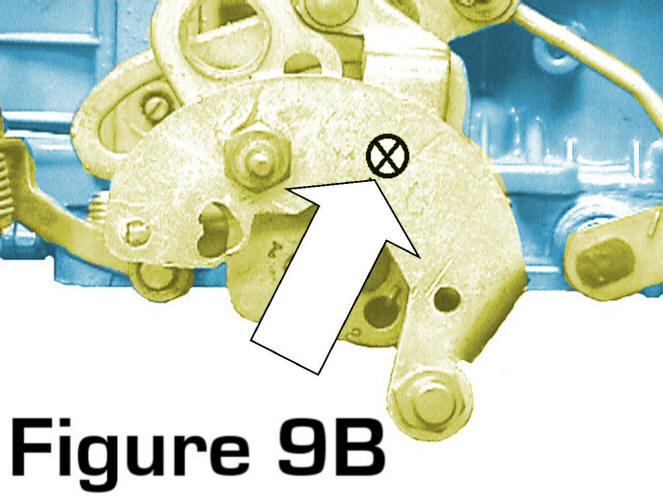
NOTE: Holley Double Pumper / Mechanical Secondary Carburetors -ONLY- Throttle lever on Older double pumper Holleys fall into a totally different application. Correct installation requires THROTTLE LEVER ADAPTER to be cut as O.E. application. (as seen in page before). Enlarge hole indicated by arrow (see Figure 9A) to 5/16". Install O.E. accelerator cable stud & nut through enlarged hole in carburetor lever and THROTTLE LEVER ADAPTER. Position THROTTLE LEVER ADAPTER against carburetor throttle lever, as indicated by (see Figure 9B), snug nut. Drill 3/16" hole through THROTTLE LEVER ADAPTER and carburetor throttle lever. (see Figure 9B) Install SCREW & NUT provided. Stud travel at bottom should be 1 1/8" - 1 1/4". Make sure that your Throttle Lever is absolutely identical to Figure 9A BEFORE Cutting Throttle Bracket!
Installation of Throttle Lever Adapter
DEMON CARBURATORS (2 different installs options)
Install Option # 1
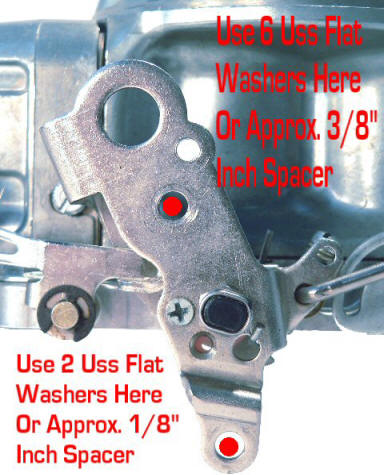
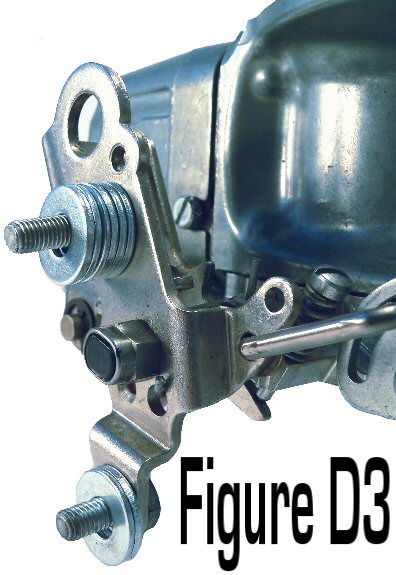
On Demon Carbs, Place (2) 1/4"-28 x 3/4" Bolts Through Throttle Lever On Demon As Shown In The Picture Above & Below. Now With 2 Bolts Installed, Install 2 USS Washers (or Approx. 1/8” Inch Spacers) At Bottom. Then Install 6 USS Washers (or Approx. 3/8” Inch Spacers) At Top As Shown. (see Figure D1, D2, & D3)


Install Adapter furnished in kit. On Demon Carbs As It Is Now
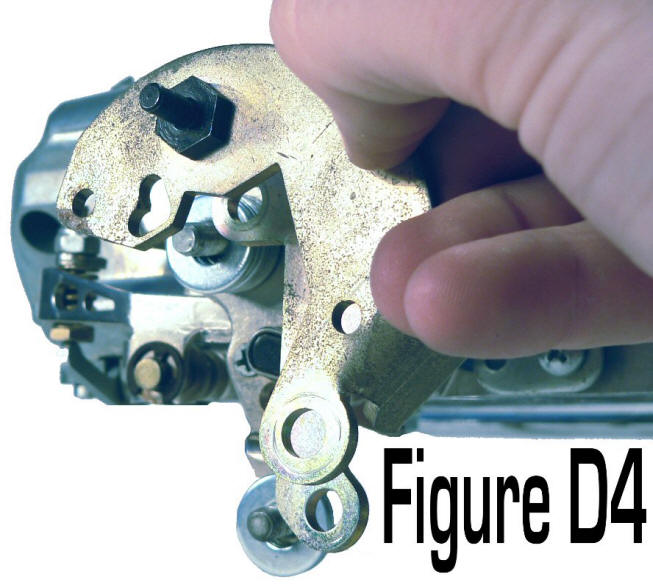
Once You Have Installed The Bolts With 2 Washers At Bottom & 6 Washers At Top Then Install Throttle Lever Adapter Bracket As Provided In Kit, As Shown. (see Figure D4)
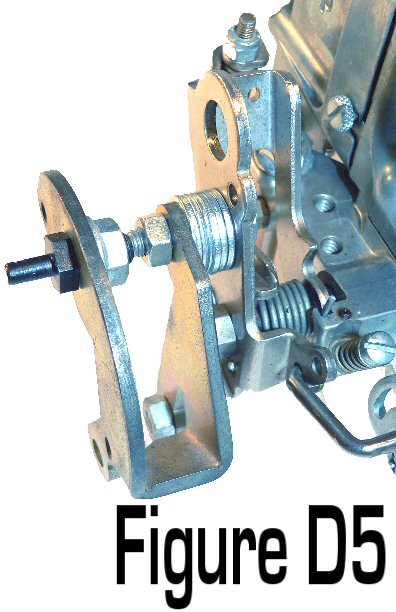
Once You Have Done This & Installed The Bracket. Install Retaining Nuts On Other Side Of Throttle Lever Bracket & Follow Remaining Cable Kit Installation Instructions.
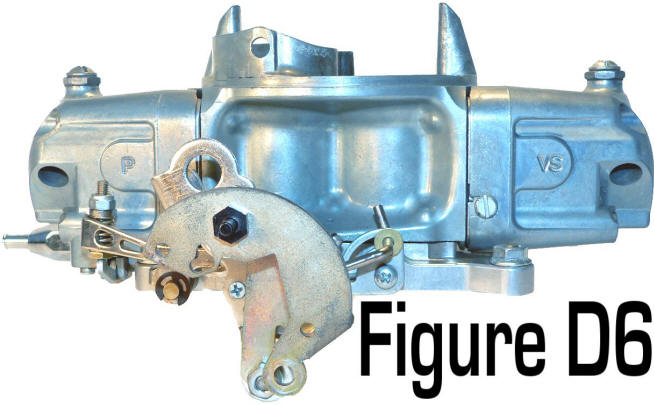
DEMON Carb. Install Completed (see Figure D6)
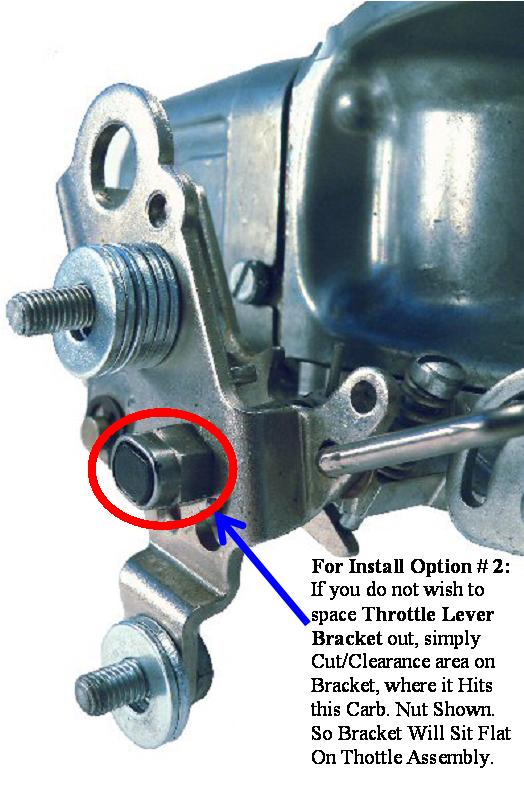
Install Option # 2
If You Do Not Wish To Space Bracket Out. Then Simply Clearance The Cable Kit Throttle Bracket Around The Area Where The Carb. Throttle Lever BOLT Is, Can Be Seen In Figure D3
Mounting or Modifying Accelerator Cable Bracket and Hardware
At this point you have two choices. You can use an O.E. Accelerator Cable Bracket or BPE part # 3395 Accelerator Cable Bracket on 4 bl. applications. (not included)
O.E. Installation
Step 1. Remove O.E. accelerator cable retaining bracket and nut. Clamp O.E. accelerator cable retaining bracket in vise and file / grind approx 1/8" off protruding tab. (see Figure 5A)

Step 2. With small hammer, carefully drive stud in O.E. accelerator bracket out and retain for later use. (see Figure 5B)

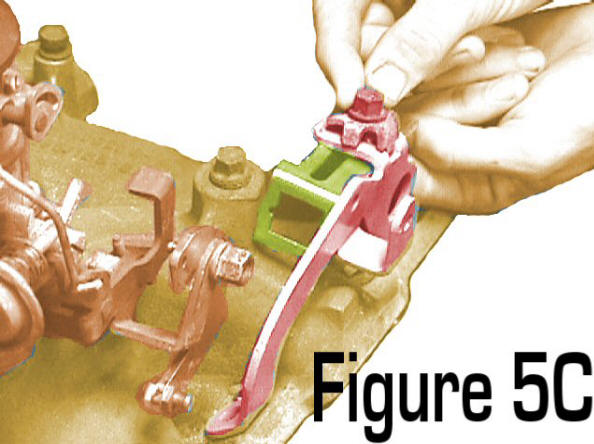
Step 3. At O.E. Throttle cable bracket, locate O.E. stud, removed in Step 2, position through CABLE BRACKET (CARB) slotted hole with CABLE BRACKET opening forward. Push stud back into O.E. throttle bracket hole and reinstall vehicles original throttle cable, reusing O.E. cable clamp and nut. (see Figure 5C)
BPE Accelerator Cable Bracket Installation (not included)
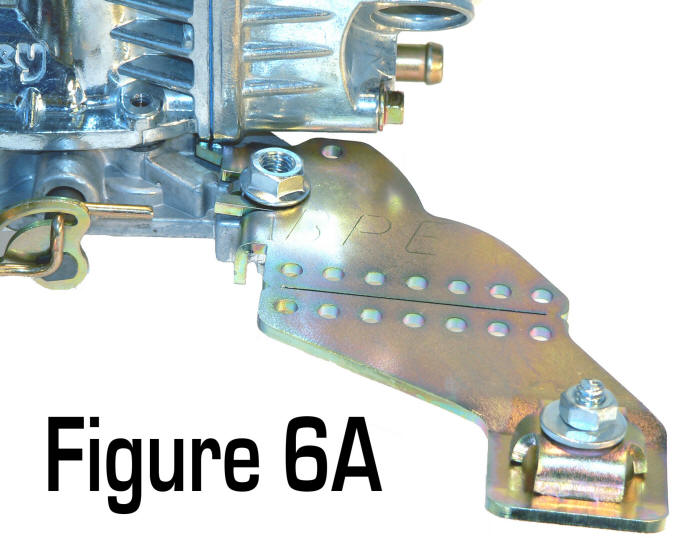
Step 1. With BPE part # 3395, remove 1/4" nut, washer and accelerator cable retaining bracket. Mount accelerator cable bracket at rear of carburetor base, As BPE3395 Instructions Indicate Make sure the bolt or stud used is long enough to accommodate increased bracket thickness. (see Figure 6A)
(# 3395 Is Shown NOT Broken, You Can Brake Down Center, Then Bolt Together, To Adjust Forward or Backwards)
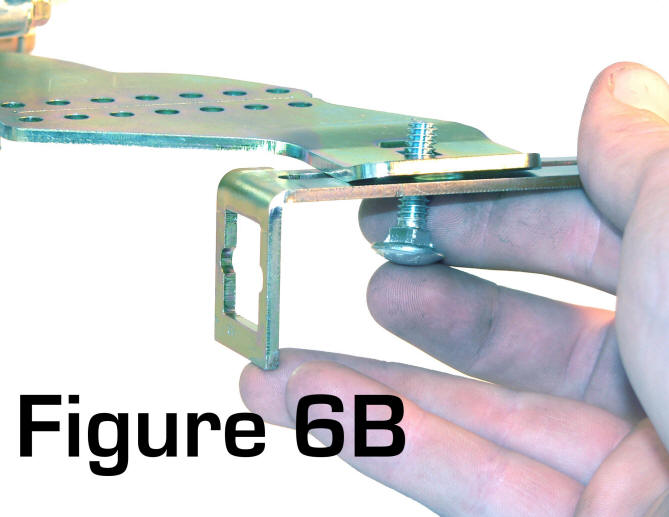
Step 2. Install CABLE BRACKET (CARB) under part #3395, reinstall carriage bolt, vehicles original throttle cable, retaining bracket, washer, and nut. (see Figure 6B) (BPE3395 Bracket Shown, Can Be Broke In Center & Bolted Back Together, To Allow Forward Or Backward Adjustment)
Transmission Hardware Installation
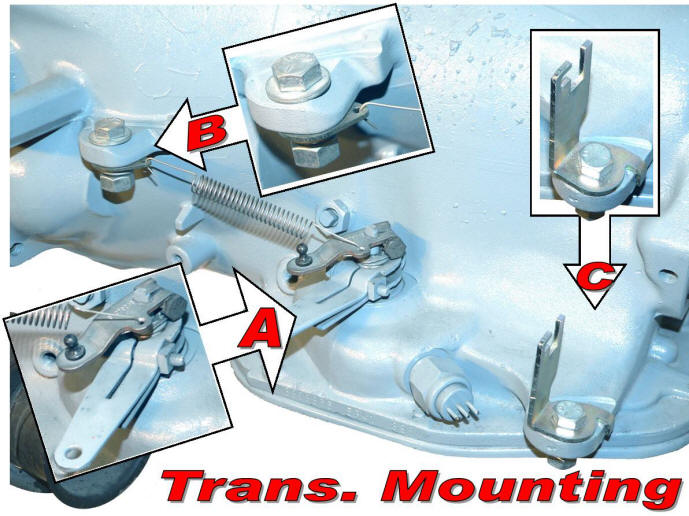
Location A: Install THROTTLE VALVE LEVER (provided in this kit) onto valve body throttle pressure stud. Lever will only install properly (1) way. Tighten pinch bolt on lever. Check movement of lever from front to rear.
Location B: Install RETURN SPRING BRACKET with O.E. selector shaft bracket stud and nut, or when not present, 7/16" x 1 1/4" BOLT NUT, FLAT WASHER, and LOCK WASHER. Install RETURN SPRING through hole in LEVER and SPRING BRACKET. Check, at this time, lever movement throughout travel and make sure it does not bind and returns back forward when released. (slight free travel in lever forward position is normal)
Location C: Install CABLE BRACKET (TRANS.) onto lower boss with 3/8" x 1 1/4" BOLT, NUT, WASHER, and LOCK WASHER provided. Some aftermarket cable shift, shifters utilize this hole also. When found, enlargement of hole in CABLE BRACKET (TRANS.) may be required. At this time, check floor clearance on installed bracket. Some early A-bodys require slight dimple of floor pan for proper clearance.
Transmission Cable End Installation
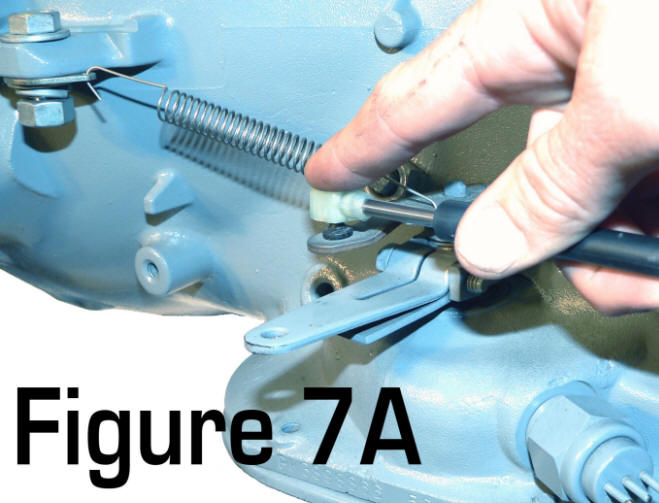
Step 1. Install CABLE END onto THROTTLE VALVE LEVER on transmission by firmly snapping ball onto stud together. (see Figure 7A)
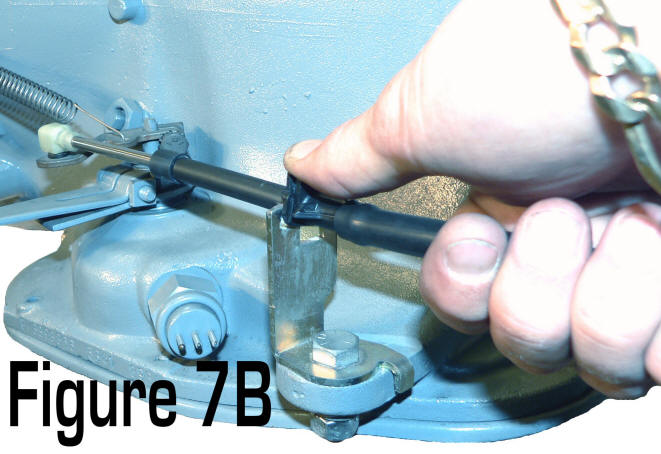
Step 2. Grab CABLE housing and snap over CABLE BRACKET (TRANS.). (see Figure 7B)
Note: Make sure at this time cable routing is clear of all obstructions including exhaust pipes and rotating components!! Using cable ties at various points makes installation permanent.
Step 3. Route CABLE onto top of main transmission case, by looping towards passenger side and following centerline of transmission case. Feed loose end of CABLE between back of engine and firewall, making CABLE (CARB. END) accessible from top of engine.
Carburetor Cable End Installation
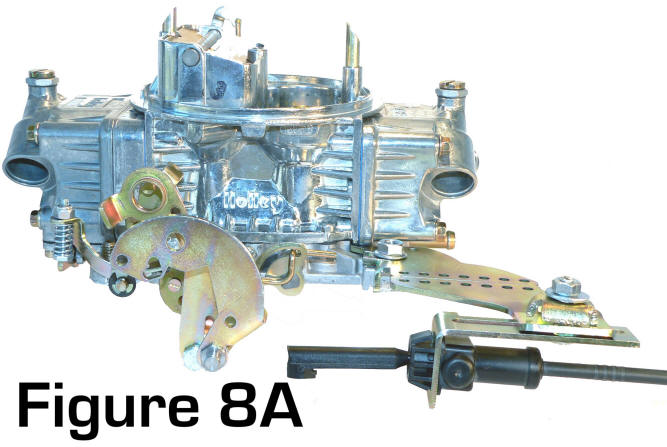
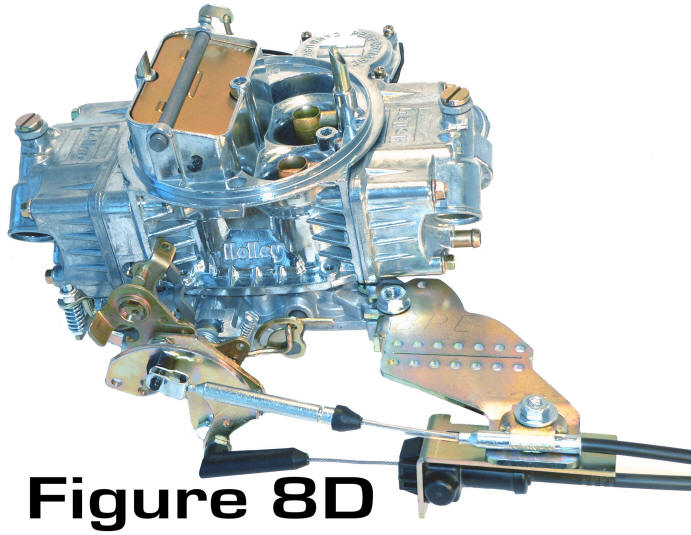
Step 1. The carburetor end of the CABLE is equipped with a spring loaded push button adjustment. The button is located opposite the round protruded end, identified with 2 arrows. The spring button is very hard to overcome but adjusts easily when pressed firmly. Make sure adjustment on CABLE exhibits bullet shaped end outside of locking housing. Insert CABLE into CABLE BRACKET (CARB.) from rear of O.E. throttle bracket forward until CABLE snaps firmly into place. (Note: cable will snap into bracket two ways due to locating ribs. (see Figure 8A)
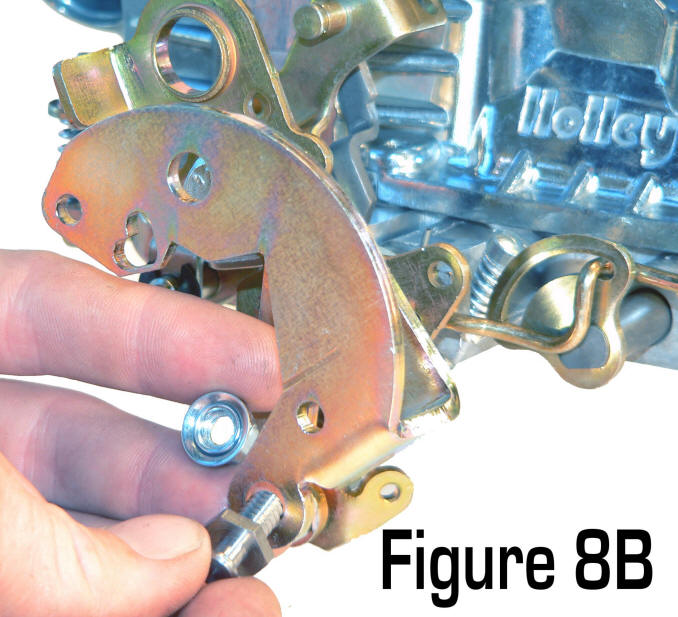
Step 2. Install KICKDOWN CABLE STUD and NUT (included) in bottom hole of THROTTLE LEVER ADAPTER. Stud may go on either side, as long as THROTTLE LEVER ADAPTER / CABLE STUD are perpendicular with cable. Non-perpendicular installations of CABLE will damage cable plastic snap on end. There is no repair for the broken plastic snap on ends except replacement of CABLE. (see Figure 8B)
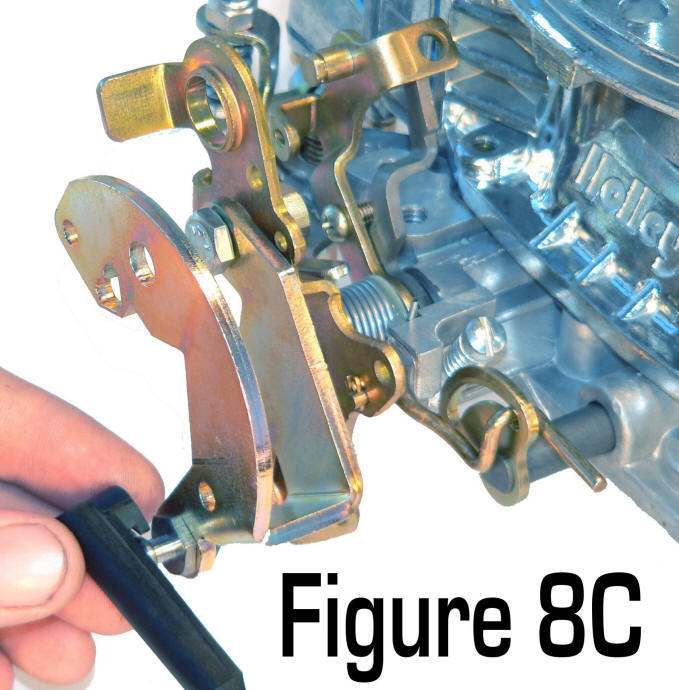
Step 3. Pull CABLE END forward and firmly; but squarely push back onto CABLE ATTACHING STUD. (see Figure 8C)
Step 4: Recheck installation of CABLE and THROTTLE LEVER ADAPTER. Some O.E. applications allow the THROTTLE LEVER ADAPTER to be installed inside or outside of original carburetor lever, for appearance or fit. At this time, examine upper CABLE with relation to THROTTLE LEVER ADAPTER. Depending on application, determine side of THROTTLE LEVER ADAPTER to install CABLE ATTACHING STUD. Tighten all STUDS, BOLTS, and NUTS installed on carburetor and THROTTLE LEVER ADAPTER. (see Figure 8D)
Step 5. Make sure choke is wide open and fast idle cam is released to hot idle position. Pull back on O.E. accelerator cable and THROTTLE PRESSURE CABLE ASSEMBLY to remove slack from both cables. Test accelerator opening of carburetor from inside and have someone outside inspecting operation of carburetor opening and closing, from idle stop to wide open throttle. Manually open carburetor throttle lever and examine throttle valve lever. At wide open throttle, THROTTLE VALVE LEVER on transmission must move rearward against stop. There is generally plenty of adjustment at the CABLE BRACKET (CARB.) to achieve this condition. If more adjustment is required, depressing button on upper CABLE END will allow ample improvement.
OVERVIEW:
1. When THROTTLE LEVER ADAPTER is installed properly on carburetor, the CABLE ATTACHING STUD will have a total travel between 1 1/8" and 1 1/4" from curb idle to wide open throttle.
2. Modifications to some O.E. accelerator brackets may be required. Both accelerator cable and throttle pressure cable work best when both cables are straight, parallel, and mounted on top of each other.
3. Some applications such as pre-67 O.E. carburetors, and many numerous applications too lengthy to list may also use this system as long as Overview #1 and #2 are kept in mind during installation. THROTTLE LEVER ADAPTER may be installed on original throttle lever with O.E. accelerator cable stud and drilling a 3/16" hole through throttle lever of carb. to correspond with heart shaped hole in THROTTLE LEVER ADAPTER and attach with 3/16" screw and nut provided in the kit.
4. O.E. Chrysler cruise control works very well with this kit. Just reinstall O.E. Lost Motion Link and split pin into 3/16" hole in front of 5/16" hole in THROTTLE LEVER ADAPTER. Reinstall cruise cable and adjust
FINISHING CHECKLIST
....All bolts, nuts, studs, and brackets secure and tight?
....Carburetor opens and closes without any binding?
....At idle, throttle valve lever is forward?
....Carburetor opens and closes smoothly from inside and outside vehicle?
....Throttle valve lever on transmission is all the way back during wide open throttle?
....Cable is routed to clear exhaust and rotating components?
....Throttle valve lever at transmission has full travel of motion, viewing from under vehicle while carburetor is opened and closed?
HELPFUL HINTS
1. If kit was originally installed on an O.E. or Carter / Edelbrock Carburetor and THROTTLE LEVER ADAPTER was cut, it can be reinstalled onto Universal Holley by purchasing Holley part # 20-7. Align & drill part # 20-7 using existing hole in THROTTLE LEVER ADAPTER. Install Screw & Nut provided.
2. Accelerator Cables have been found, in a lot of 2bl. to 4bl. change overs, to be too short. Replace with 225 6 cyl. version for your application or call us. We offer 2 extra long cables. One has the square plastic end through firewall, BPE part # CA8408. The other has the round hole held through firewall with an E-clip, BPE part # CA8418.
3. Many applications with 4bl. carburetors installed have incorrect or wrong accelerator cable brackets (due to going from 2bl. to 4bl., or taller than stock intake manifold). We recommend a NEW Accelerator Cable Mounting Bracket that installs on the mounting bolt at the rear of the carburetor. It installs the accelerator cable in the correct location and position for all one or two 4bl. applications. It works great with manual transmissions and is a perfect compliment to our Kickdown Cable Kit. It cleans up the intake appearance and gives your engine compartment that state of the art look.
BPE part # 3395
"For Holleys, Carters, Edelbrock, Demon, Claw Carburetors, ALL 4 bl. Carbs, Basically Any 4 bl. Carburetor/Intake Combo You Can Come Up With!"
See Figure 6A

